Coffee Mug to Paint: What to Buy, What Paint Sticks, and What to Avoid
Reading time: about 9 minutes
A plain mug on the counter looks simple until you try to paint it and the first coat beads up, the handle gets in the way, or the design chips after one dishwasher cycle. We see that pattern a lot: the mug itself matters just as much as the paint.
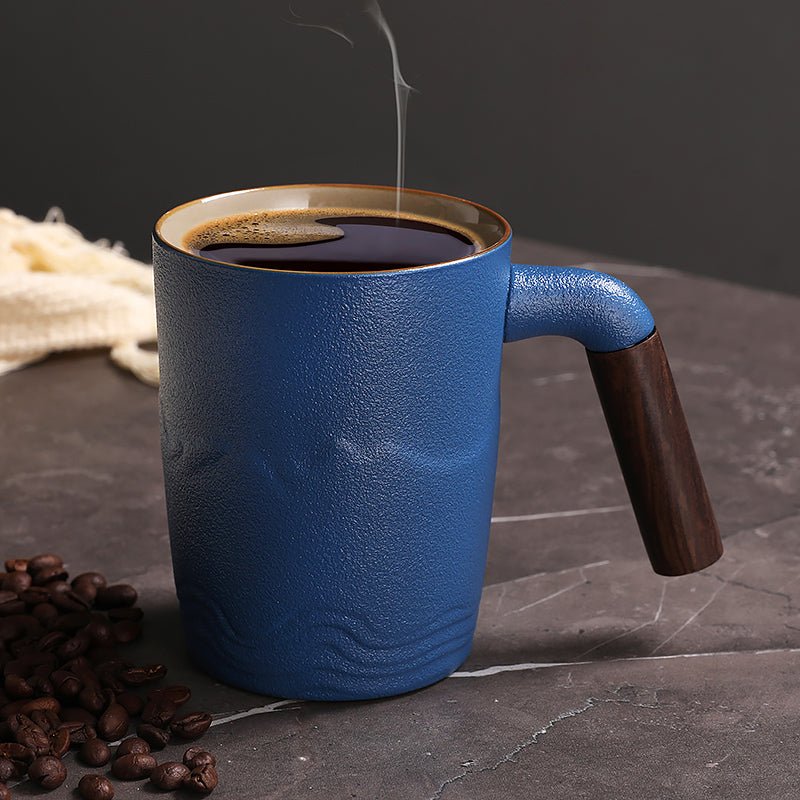
If you want a coffee mug to paint that actually turns out well, start with a smooth ceramic surface, a shape that is easy to grip, and a plan for how the mug will be used after the paint dries. If you would rather buy a finished mug than start a DIY project, take a look at our Great Mountain Coffee Tea Mug or browse our full mug collection for styles that are ready to use or gift.
What kind of coffee mug is best for painting?
The best mug for painting is usually a plain ceramic mug with a smooth glazed exterior and a shape that gives you enough room to work around the body without fighting the handle. In our experience, the easiest mugs to decorate are straight-sided or gently tapered mugs with a stable base and a handle that leaves clear space for a design band.
Here is what to check before you buy a mug for painting:
- Material: Ceramic is the safest choice for most DIY paint projects. Glass and metal can be painted, but they need different products and prep.
- Surface: A smooth glaze gives you a cleaner result than a rough or heavily textured finish.
- Shape: Wider bodies are easier for lettering, florals, and wraparound art. Tall mugs are better if you want vertical designs or landscapes.
- Rim and handle: A comfortable handle matters more than people expect. You will hold the mug a lot while painting and while sealing it later.
- Size: A 10 oz to 12 oz mug is usually easier for beginners than an oversized novelty mug, because the decoration area is more manageable.
If you want to compare size and fit before choosing a base mug, our guides on 10 oz Coffee Mug: Size, Fit, and What to Check Before You Buy and 11 oz Coffee Mug: Size, Fit, and What to Check Before You Buy are useful starting points.
Which paint works on a coffee mug?
Not every paint that looks good on paper will stay on a mug. The right paint depends on whether you want the mug to be decorative only or handled for everyday use. We always tell customers to decide that first, because it affects everything from prep to cleanup.
| Paint type | Best for | Trade-off |
|---|---|---|
| Acrylic paint | Decorative mugs and low-wash use | Needs sealing, and it is not the most durable choice for heavy dishwasher use |
| Porcelain or ceramic paint | More durable painted mugs | Often needs heat-setting or curing, and results depend on the product instructions |
| Paint pens | Fine lines, lettering, and simple patterns | Great control, but they show mistakes quickly on glossy surfaces |
| Oil-based markers | Sharp details on glazed ceramic | Can smudge if you rush the drying time |
Three practical points matter here. First, most painted mugs need a clean, degreased surface, so wash the mug with soap and dry it completely before you start. Second, glossy ceramic can resist paint at first, so a light alcohol wipe often helps remove residue from fingerprints or packaging. Third, if you want the mug to survive regular washing, follow the specific cure or bake instructions on the paint package instead of guessing.
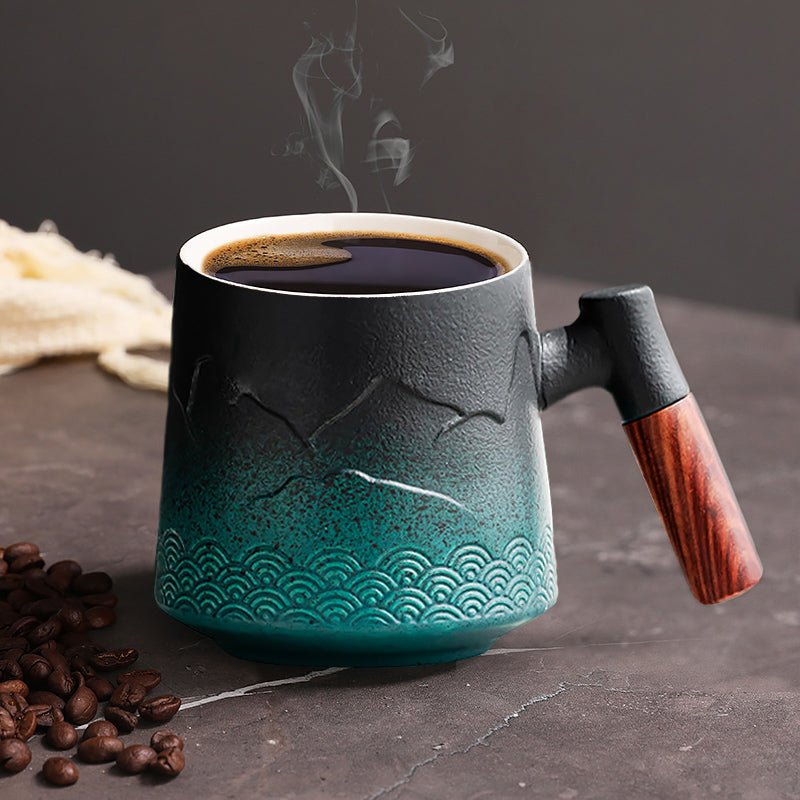
Painted mugs are not the best choice for someone who wants a fully dishwasher-safe everyday cup with no maintenance. If that is the goal, a finished mug from our store is the safer buy. A good example is the Emerald Coffee Tea Mug, which gives you a polished look without the uncertainty of a hand-painted finish.
How do you prepare a mug before painting it?
Preparation is where most DIY mug projects succeed or fail. The design can be solid, but if the surface is dirty or the paint is laid down too thick, the result usually looks uneven and wears out faster than it should.
- Wash the mug with warm water and dish soap, then let it dry fully.
- Wipe the outside with a little rubbing alcohol to remove oils from hands and packaging.
- Plan your design with a pencil or removable marker if the surface allows it.
- Use painter's tape if you want a clean stripe, color block, or logo edge.
- Apply thin layers of paint instead of one heavy coat.
- Let each layer dry before adding another detail.
- Follow the paint brand's cure instructions before using the mug.
We have seen a lot of first-time projects fail for the same reasons: too much paint near the bottom edge, brush strokes that stay visible because the coat was too thick, and designs placed too close to the lip where they are harder to drink around. Leave the rim area alone unless the product you are using is specifically rated for food-contact surfaces.
If you are curious about a taller silhouette that gives you more vertical space for art, the Landscape Tall Coffee Tea Mug is a useful reference point for shape, even if you are not painting it.
What design ideas work best on a coffee mug?
The easiest designs are the ones that work with the mug shape instead of fighting it. A handle breaks up the canvas, so simpler layouts usually look better than crowded wraparound art. That is especially true on small kitchen counters or office desks, where people see the mug from only one or two angles.
Good beginner ideas include:
- Simple initials or a name in one color
- Minimal line art, like leaves, stars, or a small mountain outline
- One accent band near the base or rim
- Polka dots or small repeated shapes
- Two-tone blocks that leave the handle and rim clean
More ambitious designs can work too, but they take more planning. Landscape scenes, fine lettering, and layered patterns usually look best on taller mugs with a more vertical body. That is one reason a shape like the Great Mountain Coffee Tea Mug is visually appealing to shoppers who like outdoor themes. The artwork already gives the mug a finished look, which is helpful if you decide the DIY route is more effort than you want to spend.
For shoppers comparing size and use cases, our post 12 Ounce Coffee Mug Buying Guide for Daily Use and Better Fit is useful if you want a bigger surface area for art or a roomier drinking capacity.
How do you make a painted mug last longer?
A painted mug lasts longer when you treat it like a decorative finish, not like factory-fired decoration. That means careful curing, gentle washing, and realistic expectations about repeated heat and moisture exposure.
Use this checklist after painting:
- Allow the mug to dry for the full time listed on the paint package.
- If the product requires heat-setting, follow the temperature and timing exactly.
- Wash by hand unless the paint instructions clearly allow dishwasher use.
- Keep abrasive scrub pads away from the painted area.
- Avoid soaking the mug for long periods.
- Do not microwave any painted mug unless the paint manufacturer says it is safe.
There is a real trade-off here. Hand-painted mugs can feel personal and make good gifts, but they are usually not the best option for someone who wants a daily workhorse mug that goes through repeated dishwasher cycles without extra care. If durability and convenience matter more than the DIY process, a finished mug is the better buy.
For readers who are deciding between a painted project and a ready-made mug, our store's collection makes that comparison easier because you can see a range of styles in one place at our full mug collection.
What should you avoid when buying a mug to paint?
The most common mistake is buying the cheapest plain mug without checking the finish. Some mugs have rough seams, inconsistent glaze, or shapes that look simple but are awkward to hold while painting. Others have interior coatings or exterior textures that make clean paint lines difficult.
Avoid these situations if you can:
- Mugs with a very glossy, slick exterior if you plan to use regular craft paint and want crisp coverage
- Deeply textured surfaces that swallow detail
- Very narrow bodies that leave little room for design
- Oversized novelty shapes that are hard to balance while the paint dries
- Unknown coatings if you plan to heat-set or seal the finish
If you are buying the mug as a gift, test the grip and the visual balance in your hand before you decorate it. A mug can look good in product photos and still feel awkward on a desk or in a cabinet. That is one reason we pay attention to handle shape and base stability in our own product selection.
Some buyers also discover they do not actually want a project. They want a mug that already looks thoughtful and polished. In that case, a ready-made option like the Emerald Coffee Tea Mug is a better fit than starting from scratch.
Frequently asked questions
Can I use a regular ceramic coffee mug to paint?
Yes, a regular ceramic coffee mug is usually the easiest starting point as long as the exterior is smooth and clean. A glazed ceramic surface gives paint a more predictable base than textured or porous finishes. Just check the paint instructions first, because not every product is meant for every type of ceramic.
What is the best paint for a mug that will be washed by hand?
Porcelain or ceramic paint is usually the better choice if you want something more durable than basic craft acrylics. Acrylic can work for decorative mugs, but it usually needs sealing and gentler handling. For a mug that will be used often, follow the curing instructions closely and keep washing expectations realistic.
Do I need to bake a painted mug?
Only if the paint or marker you use calls for heat-setting. Some products cure at room temperature, while others need oven time to bond properly to the ceramic. Do not bake a mug unless the paint instructions specifically allow it, because the wrong method can damage the finish.
Is a painted mug dishwasher safe?
Sometimes, but not always. Many hand-painted mugs hold up better with hand washing, especially if the design uses craft paint or surface markers. If dishwasher safety is important, buy a product specifically labeled for that use or choose a finished mug instead of a DIY project.
What mug shape is easiest for beginners to paint?
A straight or gently tapered 10 oz to 12 oz ceramic mug is usually the easiest because it gives you enough surface area without feeling oversized. Wide bodies are simpler for wraps and lettering, while tall mugs work better for vertical art. If you want more help choosing a size, our 10 oz and 11 oz mug guides are a practical next read.
If you are ready to choose a base mug, compare a few shapes side by side in our full collection, then decide whether you want a blank-style project or a finished mug that skips the paint step entirely.
Read more
Mug Handle: What to Check Before You Buy One
A mug handle looks simple until it is too small, too hot, or awkward on a desk. Here is how we compare handle styles, materials, and care so you can pick a mug that actually feels good to use.
Read more
Coffee Mugs Girly: How to Choose Cute Mugs That Still Work Daily
A practical guide to coffee mugs girly style, with real trade-offs on size, shape, comfort, and care. We also point you to a few mugs that work well on a desk, in a kitchen, or as a gift.
Read more
Leave a comment
This site is protected by hCaptcha and the hCaptcha Privacy Policy and Terms of Service apply.