
Cappuccino Coffee Mug Home Coffee Station Practical Purchase Checklist
Reading time: about 9 minutes
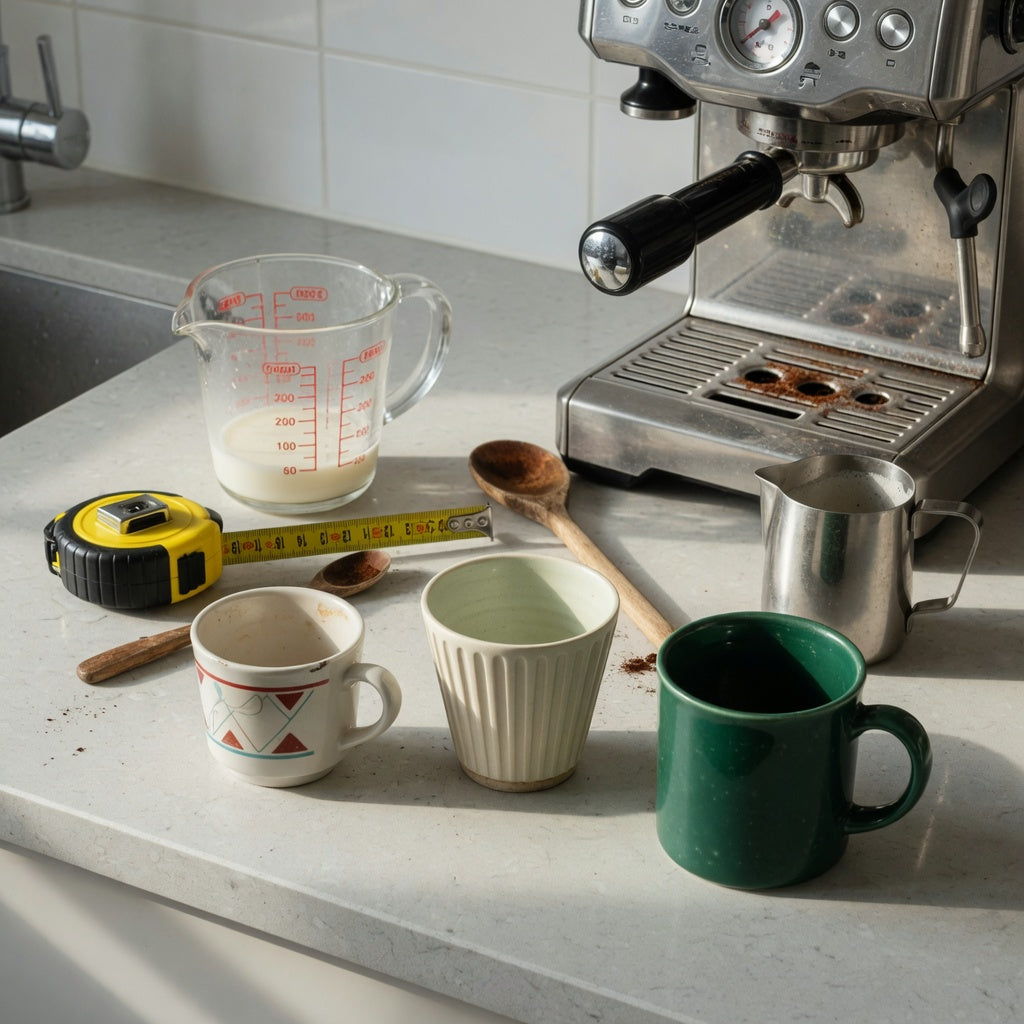
The cup clears the coffee outlet, but its handle catches the milk pitcher parked beside the machine. Move the pitcher and the spoon tray loses its place. This cappuccino coffee mug home coffee station practical purchase checklist starts with that familiar counter problem: the right cup must suit the drink, the equipment area, and the storage routine at the same time.
In our store, we find that capacity is the best first filter, but it is not a substitute for external dimensions or care instructions. The product facts we can stand behind here are the listed capacities: Retro at 170 ml, Pleated at 200 ml, and Emerald at 270 ml. We do not turn those numbers into unsupported claims about appliance compatibility, material, foam performance, heat retention, microwave or dishwasher safety, or professional barista use.
What volume reaches the cup in your real morning recipe?
Start with the drink you already make, not a standard recipe found online. Home espresso doses, milk quantities, and preferred empty space below the rim vary. A cup that suits one person's short milk drink may feel cramped or unnecessarily large for another person's routine.
- Prepare your usual coffee and record the amount of coffee and milk you add in milliliters.
- Note the final fill line in your current cup, including the space occupied by any aerated milk.
- Decide how much empty rim space you need to carry the drink without spills.
- Repeat the check for your largest regular serving, such as a slower weekend drink or a guest order.
- Use room-temperature water to rehearse the total volume if you want to test the movement from machine to counter safely.
Capacity describes how much a vessel is listed to hold; it does not tell you where you personally want the fill line. If your measured drink comes close to a listed capacity, confirm how capacity is defined on the current product page and allow the carrying margin that works for your hands and walking route.
Use our cappuccino coffee mug home coffee station practical purchase checklist
Write down each answer before comparing product photographs. A useful cappuccino coffee mug home coffee station practical purchase checklist produces measurements and confirmed requirements, not a guess based on the apparent scale of a cup on a screen.
- Finished drink volume: Record your normal and largest regular servings in milliliters.
- Preferred rim space: Include the unfilled area you want for carrying and stirring.
- Machine opening: Measure vertical clearance from the drip tray in the configuration you normally use.
- Approach path: Check the width available for the cup body and handle as you place and remove it.
- Working area: Allow space for the pitcher, spoon, sugar container, or other tools used during preparation.
- Storage: Measure shelf height, depth, and door clearance without assuming that cups will stack.
- Care requirements: Decide whether confirmed dishwasher or microwave suitability is essential to your routine.
- Material requirement: Verify the stated material rather than relying on a search phrase or product photograph.
Mark an item as unknown if the product page does not provide the relevant specification. That distinction matters. A missing measurement is a question to resolve before checkout, not permission to estimate from capacity.
170 ml, 200 ml, or 270 ml: which measured routine fits?
The three CoffeifyMug options create a clear capacity sequence. Use your measured serving plus your preferred empty rim space to decide which product deserves a closer look. A coffee cup for cappuccino still needs separate checks for physical clearance, material, and care.
| Product | Verified listed capacity | Reader situation | Next detail to confirm |
|---|---|---|---|
| Retro Coffee Tea Cup | 170 ml | Your complete serving sits comfortably below 170 ml with your chosen carrying margin. | External height, widest width including the handle, material, and care directions. |
| Pleated Coffee Tea Cup | 200 ml | Your serving needs more room than the 170 ml option provides, but remains comfortably below 200 ml. | External dimensions, storage fit, material, and care directions. |
| Emerald Coffee Tea Mug | 270 ml | You make the largest regular serving in this comparison and need more capacity than 200 ml offers. | External dimensions, machine clearance, material, and care directions. |
Choose Retro for a measured smaller serving. If your complete drink and preferred rim space fit comfortably within 170 ml, the Retro is the lowest-capacity option in this group. Open the Retro product page next and compare its current specifications with your station measurements; do not assume that lowest capacity automatically means the narrowest or shortest exterior.
Choose Pleated for the capacity step between the other two. The 200 ml listing makes sense when 170 ml leaves too little room for your actual recipe but 270 ml would add capacity you do not plan to use. Check the Pleated page for physical dimensions and care information before treating it as a confirmed machine or shelf fit.
Choose Emerald for the largest measured routine among these options. The 270 ml listing provides the highest stated capacity of the three. It is the relevant next step for a drink that does not fit your preferred margin within 200 ml, but capacity alone cannot establish its countertop footprint or clearance under an appliance.
If none of those situations matches your measurements, browse the unique coffee mugs collection rather than forcing your routine into the nearest number. Shoppers needing more than 270 ml, a sealed travel lid, documented insulation, or another specialized feature should choose a listing that explicitly provides it.
These products are presented here by listed capacity and everyday cup use only. We do not claim that the Retro, Pleated, or Emerald was designed, tested, or certified specifically for cappuccino.
Will the cup clear the machine, tools, and storage shelf?
Capacity and external size are different specifications. Vessel shape, wall profile, base, rim, and handle projection can change how a cup occupies space, so we do not estimate machine fit from the 170 ml, 200 ml, or 270 ml number.
- Measure vertical clearance: With the machine set up as you normally use it, measure from the drip tray to the lowest fixed obstruction. Compare that figure with a confirmed cup height.
- Measure the insertion route: Check whether a steam wand, side panel, grinder, or nearby container narrows the path used to place the cup.
- Include the handle: The widest overall measurement may be greater than the body diameter. Confirm handle projection instead of judging it from a front-facing photograph.
- Trace the work zone: Place your current cup, pitcher, and spoon where they sit during preparation. The open counter left around them is more useful than the total countertop width.
- Measure closed storage: Check shelf height and depth with the cabinet door shut. Do not plan on stacking unless the current listing explicitly supports that use.
Product images help with style, but perspective and lens choice make them unreliable measuring tools. If an external dimension is missing and clearance is tight, ask our team before ordering. That is especially important for built-in coffee areas, low shelves, and crowded office counters where a few millimeters can affect the placement route.
Which material and care details need an explicit answer?
Shoppers often search for a cappuccino cup ceramic, but a search term is not a material specification. The verified facts used in this comparison do not establish material or care compatibility, so confirm those details on the current listing or with our store before purchasing around them.
- Look for an explicit material description rather than identifying material by color, shine, or product photography.
- Check for a specific dishwasher-care statement before planning routine dishwasher cycles.
- Check for a specific microwave statement before reheating a drink in the cup.
- Confirm whether the listed dimensions include the handle and whether any pictured saucer or accessory is included.
- Review product-specific washing and handling directions before first use.
A household dishwasher statement, if one is provided, should not be stretched into a claim about commercial dishwasher cycles. The same restraint applies to heat retention, thermal-shock resistance, and heavy service use. If any of those points is non-negotiable, a different cup with an explicit specification is a better purchase than an attractive option with an unanswered requirement.
This is also where household routines create trade-offs. A hand-wash-only requirement would be inconvenient for someone who runs every cup through a dishwasher, while an unconfirmed microwave status does not suit a person who routinely reheats coffee. Resolve those care details first instead of discovering the mismatch during the first cleanup.
What should you check during the first unboxing?
Our team recommends inspecting a cup before putting it into the daily station rotation. Unboxing is the easiest point to separate a product issue from wear that happens later.
- Compare the received style and order details with the product page and packing information.
- Inspect the rim under good light for a chip, rough spot, or visible crack before drinking from it.
- Where a handle joins the body, look for a hairline crack or separation on both the upper and lower joins.
- Set the empty cup on a clean, flat, dry counter and check for unexpected rocking at the base.
- Read the supplied or listed care directions before using a dishwasher, microwave, or abrasive cleaner.
- Do a station dry run with the appliance cool and off, then use room-temperature water to confirm your preferred fill line and carrying route.
If something appears damaged or does not match the listing, stop using it and contact our store with clear photographs. A visual inspection cannot certify durability, but it can catch obvious rim, handle, and base problems before hot liquid is involved.
Frequently asked questions
How do I use a cappuccino coffee mug home coffee station practical purchase checklist?
Measure your finished drink volume, preferred empty rim space, machine clearance, insertion path, and storage area. Compare the drink measurement with the 170 ml, 200 ml, and 270 ml listed capacities, then verify external dimensions, material, and care details separately. Do not treat capacity as proof of appliance fit.
What cappuccino mug size should I choose between 170 ml, 200 ml, and 270 ml?
Choose the smallest listed capacity that comfortably holds your measured recipe plus the rim space you want for stirring and carrying. Retro is listed at 170 ml, Pleated at 200 ml, and Emerald at 270 ml. There is no single best capacity for every cappuccino because home recipes and fill preferences differ.
Are the Retro, Pleated, and Emerald cups ceramic, dishwasher-safe, or microwave-safe?
Those claims are not established by the verified capacity facts used in this article. Check each current product listing or ask our team for the exact material and care directions before ordering. Do not infer dishwasher or microwave suitability from appearance or from the phrase cappuccino cup ceramic.
Will these cups fit under my espresso machine?
We cannot confirm fit without the machine's available vertical clearance and the cup's verified external height and width. Measure the machine in its normal tray configuration and account for the path around any wand or side obstruction. Only compare a product after you have confirmed its current external dimensions.
Where should I compare the options after measuring my station?
Start with the product whose listed capacity matches your recorded drink: Retro at 170 ml, Pleated at 200 ml, or Emerald at 270 ml. Then use the unique coffee mugs collection to compare current photographs and specifications, resolving every marked unknown before checkout. That final check is the practical next step, especially if material, care, or machine clearance is essential.
More from our blog
Read more

White Pottery Coffee Mugs Gift Choice Practical Purchase Checklist
Choose by routine, not color alone. This checklist separates visible design facts from specifications that still need verification, then matches tall, pleated, and crane styles to realistic gift re...
Read more
Unique Design Coffee Mugs Gift Choice Practical Purchase Checklist
Match Handbag, Rhombus, and Crane mug styles to the recipient's drink, storage, grip, and cleanup routine. This checklist also identifies the product details to confirm before ordering.
Read more
Leave a comment
This site is protected by hCaptcha and the hCaptcha Privacy Policy and Terms of Service apply.