How to Draw a Coffee Mug: Simple Shapes and Real Mug Details
Reading time: about 10 minutes
A mug that looks right on paper usually starts with one thing we see all the time on a counter: a simple cylinder with a handle that actually has space behind it. If the oval is off, the whole sketch feels stiff. If the handle sits too flat, the mug turns into a cup or a toy.
In our store, we handle mugs in kitchens, office break rooms, and gift boxes, so we see the same proportion problems repeat. A plain ceramic mug is the easiest place to start. A taller profile needs a different ellipse. A novelty shape needs more patience. For a real object reference, compare a sharper silhouette like our Rhombus Coffee Tea Mug with the taller profile of our White Golden Waves Tall Coffee Tea Mug. If you want to compare more shapes before you sketch, our all mugs collection gives you a quick look at how much the body, rim, and handle can vary.
If you want a second walkthrough from the drawing side, our article How to Draw a Mug of Coffee: Simple Shapes, Shading, and Real Mug Details goes deeper on ellipses and shading. For size context, the proportions discussed in 12 oz Coffee Mug Buying Guide for Fit, Comfort, and Daily Use are useful because a taller mug changes the same drawing basics.
What should you sketch first?
Start with the body, not the handle. The body tells you the mug type, the viewpoint, and the overall weight of the drawing. A coffee mug usually reads best as a cylinder, but it is rarely a perfect one. Most everyday mugs widen slightly at the top, narrow a little at the base, or flare just enough that the rim feels open.
Use a light box or a simple frame in your head:
- Draw a vertical center line so the mug does not drift sideways.
- Block in the top as an ellipse, not a flat line.
- Set the bottom edge lower if the mug is tall and higher if it is short and sturdy.
- Keep the sides parallel only if you want a very plain diner-style mug.
A good mug sketch also needs a decision about perspective. If you are looking slightly down at the mug, the top ellipse is wider. If you are eye level with it, the ellipse becomes thinner. That single choice changes the whole drawing more than most beginners expect.
| Mug type | Best starting shape | What to watch |
|---|---|---|
| Standard ceramic mug | Simple cylinder with a soft oval top | Keep the sides slightly tapered so it does not feel like a straight tube |
| Tall mug | Higher, narrower cylinder | Make the ellipse cleaner and thinner so the height feels believable |
| Novelty mug | Basic body plus custom silhouette | Use this only after the base form is solid; unusual outlines can hide weak perspective |
How do you build the mug body so the rim looks right?
The rim is where a lot of mug sketches fail. People draw a flat oval on top and call it done. A real mug has thickness, even if that thickness is subtle. You want the viewer to feel the lip of the mug, not just the outline.
- Sketch the top ellipse lightly.
- Draw a second, smaller ellipse inside it to show the rim thickness.
- Connect the outer ellipse to the body with gentle sides.
- Erase the hidden back edge of the inner ellipse so the opening feels shallow, not like a bowl.
- Add a small base ellipse or a flattened bottom line if the mug sits flat on the table.
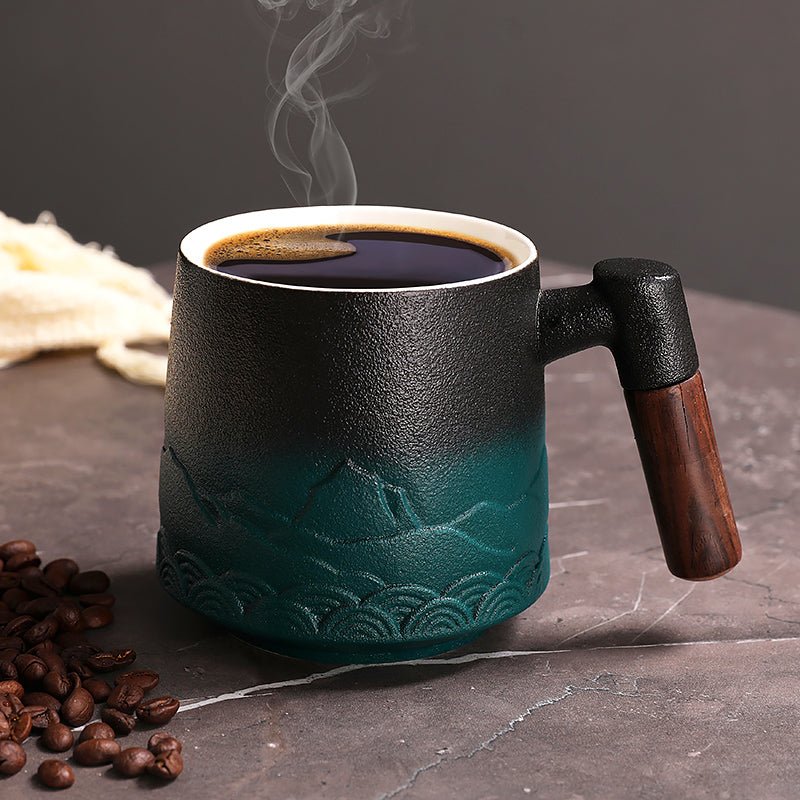
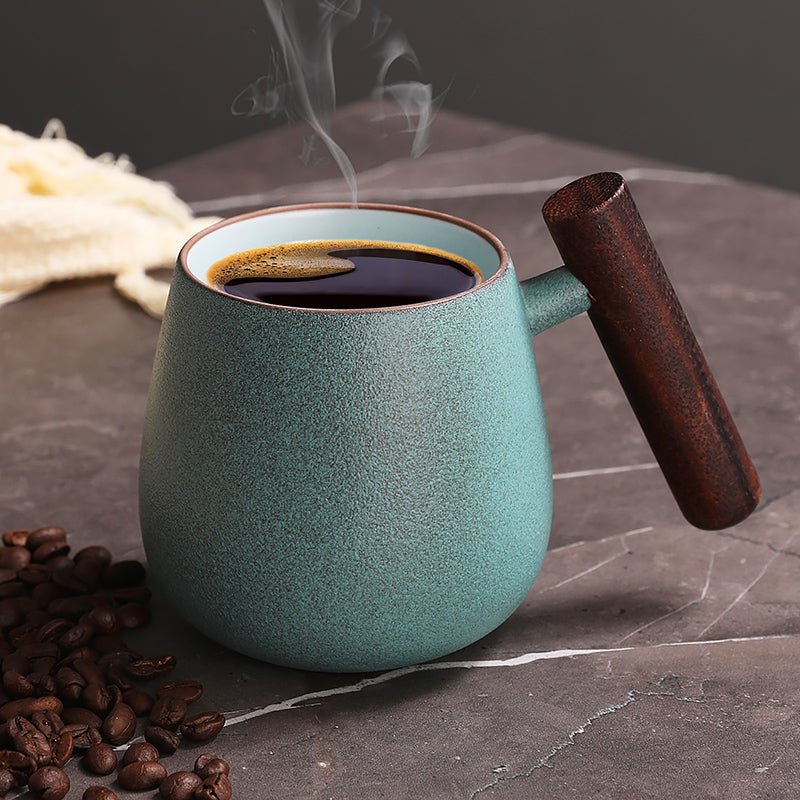
That narrow band at the rim matters. On a glazed ceramic mug, the lip often catches a brighter highlight than the body. If you ignore it, the sketch looks like a paper cup. If you overstate it, the mug becomes heavy and clunky. The right answer is usually somewhere in the middle.
Do not make the opening too wide just because you want the mug to look accessible or friendly. An overwide ellipse is one of the fastest ways to lose the shape and turn a mug into a bowl.
How do you draw the handle without making it look pasted on?
The handle should feel attached to the mug, not floating beside it. It needs two contact points and a visible gap in the middle. That gap is what tells the eye there is space for fingers. A handle with no opening looks glued on. A handle with a gap that is too small looks uncomfortable.
We usually think about handles in three pieces:
- The outer curve, which defines the overall gesture.
- The inner curve, which creates the finger opening.
- The attachment points, which should match the mug body instead of sitting randomly on it.
For a standard mug, the handle often starts just below the rim and ends around the upper half of the body. For a tall mug, the handle may look slimmer and sit a little higher. For a novelty shape like the Handbag Coffee Tea Mug, the handle is more about the silhouette than the usual mug anatomy, so it is useful for practice only after you can draw a basic mug cleanly. It is not the best starting point if your goal is a straightforward everyday coffee mug.
One practical test we use: if you erase the handle, does the mug body still read correctly? If the answer is no, the handle is carrying too much of the drawing.
What details make a ceramic mug believable?
Small details do most of the work. Real mugs are not perfect shapes. They have slight asymmetry, soft rim reflections, and tiny differences where the handle meets the body. That is especially true with glazed ceramic, which tends to show one broad highlight instead of many hard ones.
Watch for these details:
- Rim thickness: keep it visible but thin.
- Base shadow: a mug that touches the table needs a contact shadow or it looks like it is floating.
- Handle joins: the points where the handle meets the mug should feel anchored, not drawn as two separate islands.
- Surface finish: glossy mugs need smoother highlights; matte mugs need softer transitions.
- Decoration: a printed stripe or gold accent should follow the curve of the mug, not sit flat like a sticker on a rectangle.
In real use, we see mugs come out of dishwasher cycles with tiny wear at the rim, handle edge, or printed surface. You do not need to copy every imperfection, but a little irregularity helps the drawing feel owned and used instead of cloned.
If you are drawing a gift mug or a shop listing illustration, the object should still look clean. Just avoid making every line perfectly symmetrical. A little variation is more believable than strict geometry.
How should you shade a mug so it still feels round?
Shading is where the form turns from diagram to object. The goal is not to cover the mug in dark pencil. The goal is to show that the surface curves away from light.
We usually build shading in this order:
- Pick a light source and keep it consistent.
- Leave the brightest area on the side facing the light.
- Darken the far side gradually, not in a hard block.
- Add a cast shadow under the mug so it sits on the surface.
- Keep the handle slightly darker on the inner side because it curves inward.
A common mistake is over-shading the body while leaving the rim and handle flat. That makes the mug feel heavy on one side and pasted on the other. Better to keep the values simple: light, mid-tone, and one darker accent for the shadowed edge.
If you are drawing a white ceramic mug, resist the urge to color the whole thing gray. White objects still have value shifts. They just rely more on subtle shadow than on strong fill. A glossy white mug with gold details, like the finish on our White Golden Waves Tall Coffee Tea Mug, needs the highlight to stay clean so the surface does not look chalky.
What mistakes do beginners make most often?
The mistakes are usually simple, but they change the whole read of the drawing. We see the same problems again and again when someone sketches from memory instead of from a real mug.
- The rim is too flat: the mug loses depth and becomes a circle on a rectangle.
- The handle is too small: the mug looks hard to use, even if the rest is accurate.
- The body is too perfect: real mugs have slight variation, especially around the lip and base.
- The shadow is missing: the mug appears to hover over the page.
- The perspective changes halfway through: the top ellipse and body sides should agree with each other.
Another problem is choosing the wrong reference. A novelty shape is fun, but it can hide the fundamentals. If your goal is to learn proportions, start with a plain mug first. If your goal is to practice product illustration, then a more decorative shape can help once you have the basics down.
How can you use a real mug as a better reference?
A real mug on a desk gives you information a photo often hides. You can see the lip thickness from the side. You can see whether the handle sits high or low. You can also notice how the bottom shadow behaves on a wood table versus a white kitchen counter.
That matters if you are drawing for a product page, a gift card, or a social post. A mug that looks accurate at thumbnail size needs a clean silhouette. A mug that looks accurate up close needs the little details: a slight reflection on the glaze, a solid handle join, and a base that really touches the surface.
For sizing context, the everyday mug guides in our blog can help you decide how much body height to show. A shorter 10 oz or 11 oz mug will usually read squatter on the page than a taller 12 oz style, even if both are simple ceramic mugs. That difference matters if you are sketching from memory and want the proportions to feel believable.
Frequently asked questions
What is the easiest way to draw a coffee mug?
Start with a light cylinder, add an ellipse for the top, then attach a handle that leaves a visible opening. Keep the shape simple at first. Once the proportions work, add the rim thickness, base shadow, and a few shading passes.
How do I make the mug look round instead of flat?
Use an ellipse for the opening and shade one side more than the other. A round mug needs curved edges, not straight vertical walls all the way down. A subtle highlight on the light side helps the surface read as ceramic.
How do I draw the handle in perspective?
Draw the outer handle curve first, then mirror a lighter inner curve that follows the same angle. The opening should narrow a little if the handle turns away from you. If the handle looks like a flat loop with no depth, the perspective is probably too even.
Should I use a photo or a real mug as my reference?
A real mug is better for noticing the thickness of the rim, the way a handle joins the body, and how light behaves on glaze. A photo is useful if you need a clean angle or a quick reference. The best result usually comes from looking at both.
What kind of mug is best for a beginner to draw?
A plain ceramic mug with a simple handle is the easiest starting point. Avoid highly decorative shapes until the cylinder and ellipse are comfortable. A novelty mug can be helpful later, but it is not the cleanest first sketch.
If you want a practical next step, compare one straight-sided mug, one tall mug, and one novelty shape in our all mugs collection, then sketch the one with the clearest silhouette first. That makes it easier to judge the rim, handle placement, and body height before you commit to ink.
More from our blog
Read more
Pug Dog Coffee Mugs: What to Look For Before You Buy
Pug dog coffee mugs work best when the shape, handle, and finish fit real daily use, not just the photo. We cover what to check, what to avoid, and which mug styles make the best gift or desk compa...
Weiterlesen
Garfield Coffee Mug Buying Guide for Daily Use and Gifts
A Garfield coffee mug should do more than show a familiar face. We break down size, handle comfort, print durability, and care so you can pick one that works for real coffee runs and gift giving.
Weiterlesen
Hinterlasse einen Kommentar
Diese Website ist durch hCaptcha geschützt und es gelten die allgemeinen Geschäftsbedingungen und Datenschutzbestimmungen von hCaptcha.