How to Draw a Mug of Coffee: Simple Shapes, Shading, and Real Mug Details
Reading time: about 10 minutes
A coffee mug is one of the easiest objects to sketch badly. The rim turns lopsided, the handle floats too far away, and the cup ends up looking more like a bowl with an ear than a real mug. We see that a lot in product mockups and quick doodles, especially when someone is trying to draw the mug from memory instead of looking at the actual shape in front of them.
If you want how to draw a mug of coffee in a way that looks believable, start with the object you already know from the kitchen counter: a cylinder with a slightly visible oval top, a handle that has thickness, and a base that usually reads narrower than the body. That simple structure matters more than decorative details. A mug that feels solid on the page is usually drawn from the same logic as a mug you would actually hold in one hand during a work break or at the sink after washing up.
We sell mugs, we handle them, and we see how shape changes the way a mug feels in real use. That perspective helps when you draw one too. The goal is not a perfect illustration. The goal is a mug that looks like it could sit on a desk next to a laptop or on a breakfast table beside a spoon.
What shape should you sketch first?
Start with a very light cylinder. Draw two gentle vertical sides and connect them with an oval on top. The oval should not be a full circle; it needs a slight tilt and width so the viewer reads it as the opening of the cup. For a straight-sided mug, keep the sides almost parallel. For a more common ceramic mug, let the sides taper just a little toward the base.
We usually tell shoppers to think about everyday mug proportions, because that is what the eye recognizes fastest. A standard mug often feels stable because the body is broad enough to hold comfortably but not so wide that it looks like a soup bowl. If you want to compare different real-world sizes while you sketch, our 12 Ounce Coffee Mug Buying Guide for Daily Use and Better Fit is a useful reference for proportions and daily-use fit.
Three shape checks help a lot:
- Top opening: Keep the rim oval, not perfectly round, unless you are drawing the mug from directly above.
- Body width: Make the mug wider than the handle opening so it reads as a usable cup, not a tiny cup or teacup.
- Base: Narrow the bottom slightly or add a faint foot ring to keep the mug grounded.
How do you draw the handle so it looks attached?
The handle is where most beginner sketches break. It needs thickness, spacing, and the same perspective as the cup body. We recommend drawing it as a rounded rectangle or a stretched C-shape that starts and ends on the mug’s side wall. Leave a visible gap between the handle and the mug body so it does not look fused into the cup.
From our experience with actual mugs on shelves and in hand, the handle should feel like something you can grip with two or three fingers, not a paper-thin loop. In real products, handles also vary in how open they are. Some are roomy for a larger grip; some sit tighter and are better for compact cups. If you want a few mug shapes to compare visually, browse our collection of coffee and tea mugs and notice how handle openings change the silhouette.
A useful handle checklist:
- Draw the outer curve first.
- Match the inner curve so the handle has actual thickness.
- Connect both ends to the body with short, clean joins.
- Check that the handle sits at the same angle as the mug’s perspective.
If the handle looks flat, add a touch of shadow where it meets the mug. That tiny shadow does more work than extra line detail.
Where should the coffee and steam go?
If you are drawing a mug of coffee, the liquid level matters. A filled mug should show the coffee surface as a second, slightly smaller oval inside the rim. Keep a thin margin between the coffee line and the lip so the mug does not look overfilled. A mug that is nearly full can still feel realistic, but if the liquid reaches the brim it usually looks unstable unless you are drawing a splash or pour scene.
Steam is optional. It helps when you want a morning mood, but it can overpower a simple sketch if you add too much. Use two or three soft wavy lines rising from the cup. That is enough. Steam should stay loose and light, not drawn like smoke from a fire.
We often see people overwork the beverage inside the cup. That makes the mug itself disappear. Keep the coffee surface simple and let the container remain the focus. If your drawing is meant to feel like a product sketch, a clean mug shape is usually more useful than a heavily stylized drink effect.
Real mugs read better when the cup edge, liquid line, and handle all agree on perspective. If one of those three is off, the drawing starts to feel crooked fast.
How do you shade a mug so it looks round?
Shading is what separates a flat outline from a mug with volume. The easiest method is to pick one light source and stay consistent. If the light comes from the left, keep the left side lighter, add a mid-tone across the body, and place the darkest shadow near the right edge, under the rim, and where the handle overlaps the cup.
For a ceramic mug, keep the shading smooth. Most ceramic surfaces do not look like rough paper; they carry soft reflections. That means your pencil or digital shading should have clean transitions. A bright highlight strip along the curved side can suggest glaze. On darker mugs, that highlight can be narrower and more subtle.
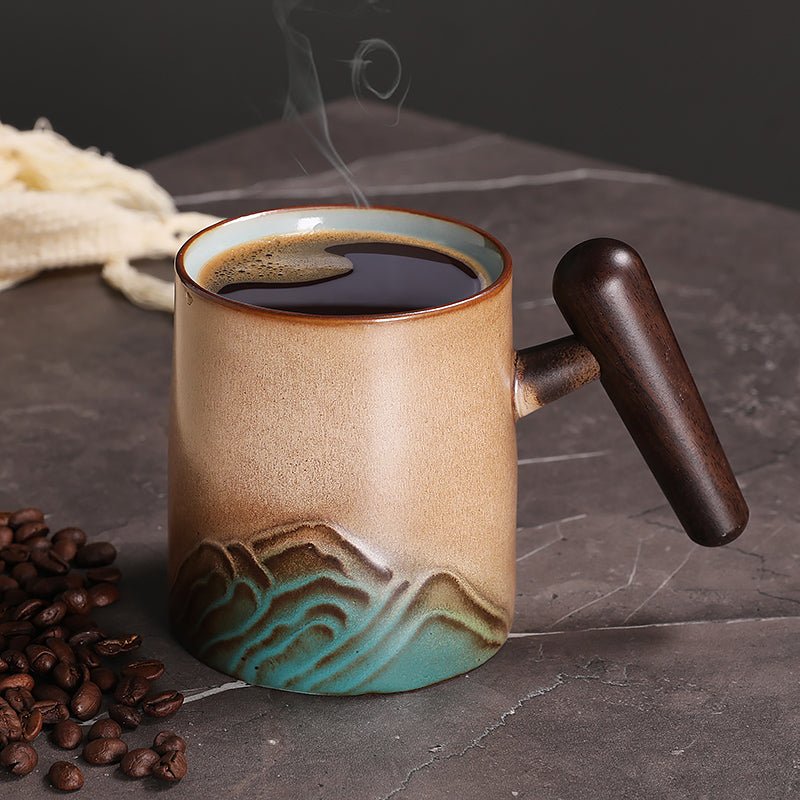
We see real-world wear in mugs too. Tiny scuffs near the base, faint dishwasher marks, and small glaze variations show up in daily use. You do not need to draw every mark, but a slight tonal difference near the bottom can make the mug feel less artificial. If you want a visual example of a mug design with stronger surface contrast, our The Flow Coffee Tea Mug is a helpful model for shape and surface rhythm.
A practical shading order:
- Block in the light side and shadow side first.
- Darken under the rim to create depth.
- Shade behind the handle so it sits in space.
- Add one highlight, not ten small ones.
What details make a coffee mug look real instead of generic?
Small details do the heavy lifting. A real mug usually has a slightly thicker rim than a drinking glass. The base often has a foot ring or a subtle flattened bottom. The handle may attach higher on the body than you first expect. These details are easy to miss, but they are exactly what make the sketch look like a mug you might actually set on an office desk or beside a coffee machine.
From our side, handling mugs day after day, three details stand out as the most useful to draw accurately:
- Rim thickness: A thin line makes the mug feel fragile. A modest rim thickness feels more like ceramic.
- Handle gap: The gap between the handle and the cup body should be visible from the side view.
- Base shadow: A small cast shadow anchors the mug to the table.
If you want a mug design with a more scenic shape language, the Mountain Sea Coffee Tea Mug is a good reference point. If you want a simpler, more utilitarian silhouette, the Spittoon Coffee Tea Mug shows how plain forms can still look strong on the page.
What a mug drawing is not great for: ultra-complex reflective glass effects, ornate porcelain patterns, or highly technical product illustration with exact dimensions. If your goal is a sales-ready packaging render, you will need tighter perspective and more controlled lighting than a casual sketch.
Should you draw it from the side, three-quarter view, or top view?
For most beginners, the three-quarter view is the easiest and most forgiving. It shows the rim, body, and handle all at once. A pure side view is simpler, but it can feel flat if the oval opening disappears. A top view is useful for showing the liquid surface, but it hides the handle and most of the cup body.
Here is how the views compare in practice:
| View | Best for | Trade-off |
|---|---|---|
| Side view | Simple shape practice | Less depth, can look flat |
| Three-quarter view | Most realistic mug drawing | Needs better perspective control |
| Top view | Showing coffee surface, foam, or steam | Hides the handle and body |
We use the three-quarter angle often when showing mugs online because it gives shoppers the best sense of size, handle room, and profile in one look. For buyers trying to judge comfort before ordering, that angle is also the one that reveals the most.
What are the most common mistakes when drawing a mug of coffee?
Most bad mug sketches fail for the same few reasons. The good news is that all of them are fixable with a quick correction pass.
- Perfect circles: A mug opening is usually an oval in perspective, not a circle.
- Floating handles: The handle needs clear connection points and thickness.
- Flat sides: Even a straight mug usually benefits from a tiny curve or perspective taper.
- Heavy steam: Too many steam lines make the cup lose focus.
- No cast shadow: Without one, the mug can look like it is hovering above the table.
Another common issue is ignoring real mug proportions. A mug that is too tall and narrow can start looking like a vase. A mug that is too wide can read like a bowl. If you want to double-check what everyday mug sizes actually look like in use, our blog posts 11 oz Coffee Mug: Size, Fit, and What to Check Before You Buy and 10 oz Coffee Mug: Size, Fit, and What to Check Before You Buy are helpful for comparing proportions before you draw or buy.
How can you practice with a real mug on your desk?
The quickest way to improve is to put a mug on the table and draw what you see, not what you assume. Set it beside a lamp or window so the shadow is easy to read. Rotate it a little and sketch it again. That small habit teaches you more than copying the same outline ten times from memory.
In our store, we think about how mugs show up in real spaces: kitchen counters, office desks, bedside trays, and gift boxes. That context matters because the mug does not exist alone. It lives among spoons, notebooks, keyboards, and dish racks. When you include one or two nearby objects in your practice drawing, the mug suddenly feels anchored in a real setting.
Try this quick exercise:
- Place a mug on a plain table.
- Draw a light box around the mug first to judge its footprint.
- Sketch the cylinder and handle.
- Add the coffee line and a small shadow.
- Repeat from a different angle.
If you want a real product to compare against while practicing, browse our full mug collection and study the differences in handle space, wall thickness, and shape. Real objects give you better proportions than imagination alone.
Frequently asked questions
How do you draw a mug of coffee for beginners?
Start with a light cylinder, add an oval rim, then attach a thick C-shaped handle. Keep the coffee surface simple and add one shadow to ground the mug. That is usually enough for a clean beginner sketch.
How do I make the mug handle look 3D?
Draw both the outer and inner edges of the handle so it has thickness. Add a small shadow where the handle meets the mug body. That overlap is what makes it look attached instead of floating.
Should the coffee inside the mug be a full oval?
No. The coffee surface should usually be a slightly smaller oval inside the rim. If the cup is tilted in perspective, the coffee line should follow that same angle. A perfect circle often looks wrong unless you are viewing the mug from directly above.
What is the easiest angle to draw a coffee mug from?
The three-quarter view is the easiest useful angle. It shows the rim, the body, and the handle together, so the mug reads clearly. Side view is simpler, but it tends to look flatter.
How do I make a drawn mug look like ceramic?
Use smooth shading, a thicker rim, and one soft highlight on the curved side. Ceramic usually reads as solid and slightly reflective, not matte like paper. A small base shadow also helps the mug feel real.
If you want to keep practicing with real mug shapes while you sketch, start by comparing the designs in our full collection, then pick one silhouette to redraw from a side angle and a three-quarter angle. That side-by-side comparison will show you exactly which part of the mug is giving you trouble.
Read more

Father's Day Coffee Mug Gift Guide: Which One Fits Dad?
A practical Father's Day coffee mug guide for shoppers comparing style, comfort, daily use, and care. See which mug fits a desk, kitchen counter, or outdoor-minded dad.
Czytaj dalej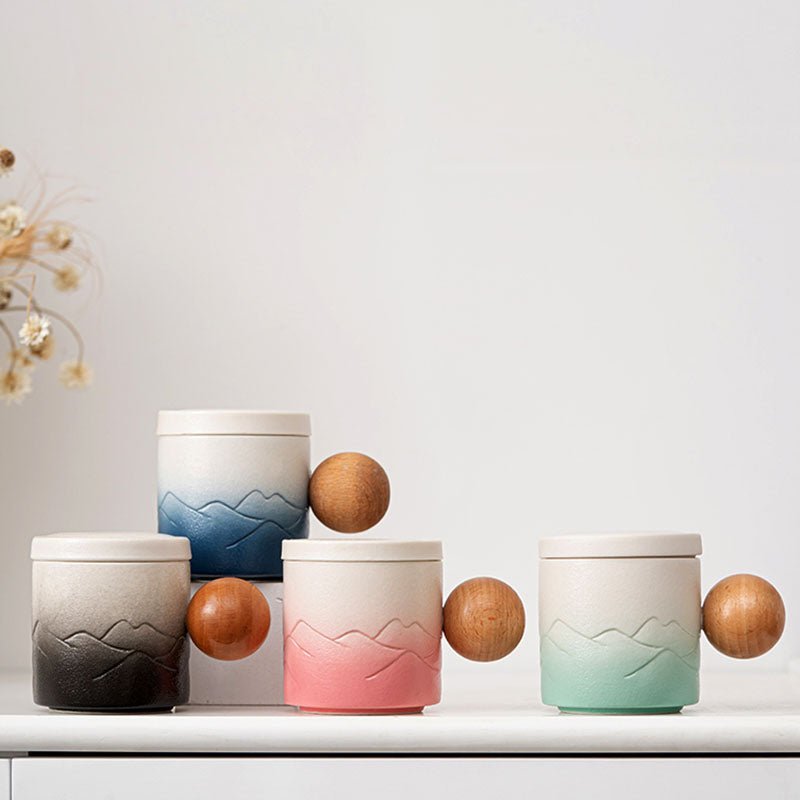
Nutcracker Coffee Mug Buying Guide: Size, Material, and Gift Fit
A nutcracker coffee mug should do more than look festive. We break down size, handle style, care, and gift value so you can buy one that works on a real kitchen counter.
Czytaj dalej
Zostaw komentarz
Ta strona jest chroniona przez hCaptcha i obowiązują na niej Polityka prywatności i Warunki korzystania z usługi serwisu hCaptcha.